24 Reef balls were deployed in two reefs at Long Bay-Okura Marine Reserve in 2001.
Launching the reef balls, photo care of Jonathan Jaffrey
They were quickly colonised and dramatically increased the biodiversity in the area.
A lonely reef ball, photo care of Jonathan Jaffrey.
I have wanted to find these artificial reefs for years and made three attempts. The first dive from the shore was unsuccessful (its too far out and I dont have underwater GPS). The second and third efforts below used line and sonar but still came up empty. I think they have been buried (sunk into the substrate) but I would love to be wrong. The photo above shows a lot more shell on the seafloor than I found 20 years later. I’m not planning any future searches.
12 January 2022 4:15pm High Tide 5-10 knots .5m-1m swell Shaun Lee & Jordi Tablada
Boat to from Winstons Cove to Long Bay 12:00pm Look for Reef Balls:
Zig Zag Reef 36° 40’ 52” S, 174° 45’ 14.8” E 36.681111, 174.754111 5.5m at Low tide
Octagon Reef 36° 40’ 51.1” S, 174° 45’ 19.6” E 36.680861, 174.755444 6.2 M at low tide
Dropped anchor 5m from Zig Zag using Garmin GPS Dived down anchor with line on reel Vis 5m surface, <1m bottom 5.5m deep, tied line around anchor, spiral search pattern Let line out >30m possibly didn’t turn enough and made more of a sweeping arc Hoped line would have snagged of epibenthic fauna attached to reef balls but following line back found nothing Quick check near boat found nothing c30mins total bottom time Noted layer of mud under sand A few cushion stars, some heart urchins, Jordi saw a Spengler’s Trumpet Some dead tutua shells under sand Large snapper under us when we surfaced
Dropped anchor 5m from Octagon using Garmin GPS 7 minute look in the direction of the reef Nothing in particular
2:30pm head back as wind pickup up (15knots developing in afternoon).
Resolved to search with a boat that has sonar / fish finder next time.
Thursday 9 September 2022 High Tide 5:30pm With skipper Ed Chignell
Zig Zag Reef 6.7m 2:45pm c7 spirals out from waypoint. No clear benthic structure seen on downscan or sidescan.
Octagon Reef 8m 3:10pm c3 spirals out from waypoint. Drifted south over fishy looking shape 5m south of the waypoint on the downscan. It was still there 5 minutes later so we dropped anchor on it.
I descended the anchor line. Vis 3m, bottom 8.8m. I spiralled out from the anchor for 5 minutes then headed north for an additional 5 minutes. The seafloor was sand/mud with some shell. Nine cushion stars and about six large hermit crabs were seen in 10 minutes. After ascending and heading a bit further south I dropped down for another 5 minutes to check out another fishy shape but didn’t see any reef balls or fish. Many fish were seen in the fish finder.
Note visibility much better than last dive even tho it rained heavily just a few days ago. Hardly any swell or wind over the last two days.
With video lights increasing in power some underwater photographers are wondering if they should skip the strobes and go for more expensive videos lights that deliver a WYSIWYG (what you see is what you get) photographic experience. Here I test a Sea & Sea YS-D3 II Strobe and a BigBlue 36000-Lumen Pro Video light. See testing setup photo above with lamp on which was turned off for the test. Settings: 1/250, F14, ISO 100 on an exposed and fogged up Laowa Probe Lens with no focusing light.
YS-D3 II Strobe only on left hand side. Full power manual no focus light, default diffuser on.BigBlue 36000-Lumen Pro Video only on right hand side. Full power.Strobe on left video light on right.
They seem to be about equal power which is interesting as I would have thought I would get more power from the strobe which has a guide number of 33. The difference in colour temperature is negligible with white balance set to auto (YS-D3 II Strobe = 5,800k, BigBlue 36000 = 6,500k).
I think its safe to call the YS-D3 II Strobe a 36,000 lumen light.
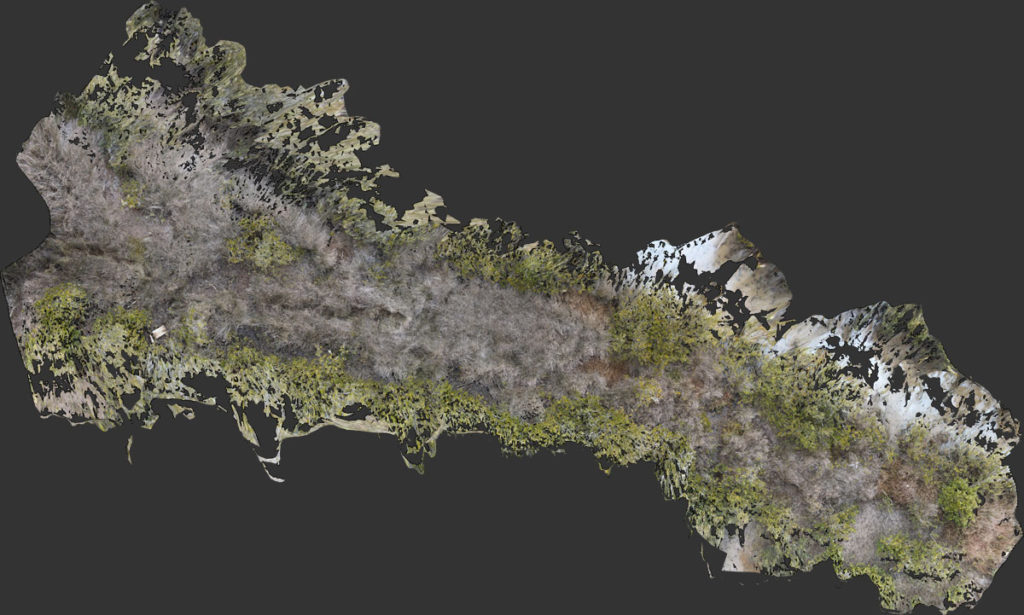
Here is a simplified version of my photogrammetry settings in Agisoft Metashape Standard 1.8.1 (mostly for my own reference). Detailed explanation here Mapping life on the seafloor/
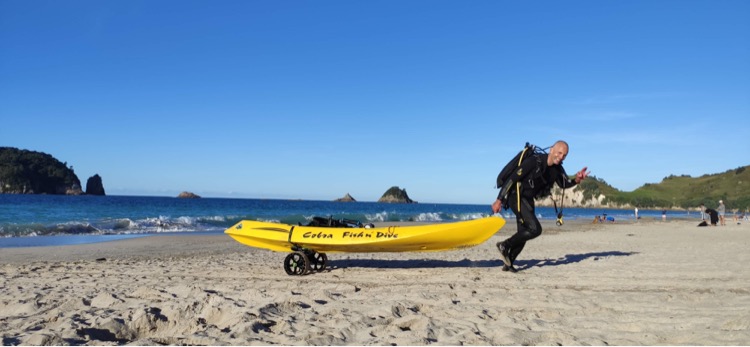
I figured out how to dive from my kayak this summer. It’s been really fun with lots of advantages including:
Less swimming effort for shore dives
Lower emissions than diving from a boat
Some locations are easier for me to access via kayak
Less drama / hassle than a boat
At first I tried towing my kayak to the water with my tank onboard. The C-Tug SandTrakz Cart Kayak Trolley is great but not designed to carry so much weight. Even without the tank I have broken one of the straps. I now carry my tank and BCD while towing the kayak with everything else onboard including my weights.
The other thing I find very useful is these stainless steel D-Eye Swivel Snap Hooks. The anchor, wheels and camera all get clipped on so nothing falls off. Even though I have clips for my paddle I tie it on as I really dont want my paddle gone when I resurface.
I found putting the BCD on in the kayak too hard so I just do that in the water, it has its own little rope & clip so it does not float away. I also 3D printed a fitting to get a little dive flag going but it should be bigger.
I love having more gear closer when shore diving, including my phone, dry keys and something warm to eat as soon as I get out of the water :D. I’m sure my set up will evolve over time (I need a slightly heavier anchor for soft substrates) but I’m really happy with this and plan to do lots more.
Extra photos by Kirk Tucker
Update August 2024
With the C-Tug Double Up Bar (four wheels!) I can now take everything down to the beach in one trip. I’m not quite strong enough to get it back up the steepest bit of sand in one trip and I take the dive tank back up separately.
I have been helping out Auckland Zoo and the Department of Conservation with important conservation work, and last year Auckland Zoo had an unusual request.
“Can you make flamingo eggs? Our flock of Greater flamingos have a tendency to kick their eggs into the water, so we give them a ‘dummy’ egg whilst we place their precious egg safely in an incubator.”
In the past I have only assisted with endemic or threatened species so I was a little hesitant, that was until I went on a short tour of the Zoo’s flamingo habitat and met the birds. I learnt that in the wild, flamingo habitat is indeed threatened, and I was captivated by these elegant, head-high birds. One of the young females named ‘Otis’ wandered over and gave me a friendly chest bump. Immediately smitten, I have made 21 eggs for the flock. There were two technical challenges:
The eggs have an unusually rough surface, I started off covering the smooth 3D printed models with epoxy but this quickly became laborious. Instead, I sculpted a texture on the 3D model and was impressed how well it printed.
I had to get the weight just right. I achieved this by filling the eggs with sterilised sand, then water to make sure pressure changes from expanding and contracting air bubbles would not stress the resin shells.
One of the eggs has been successfully tested and I hope Otis & co will be happier spending more time sitting on eggs.
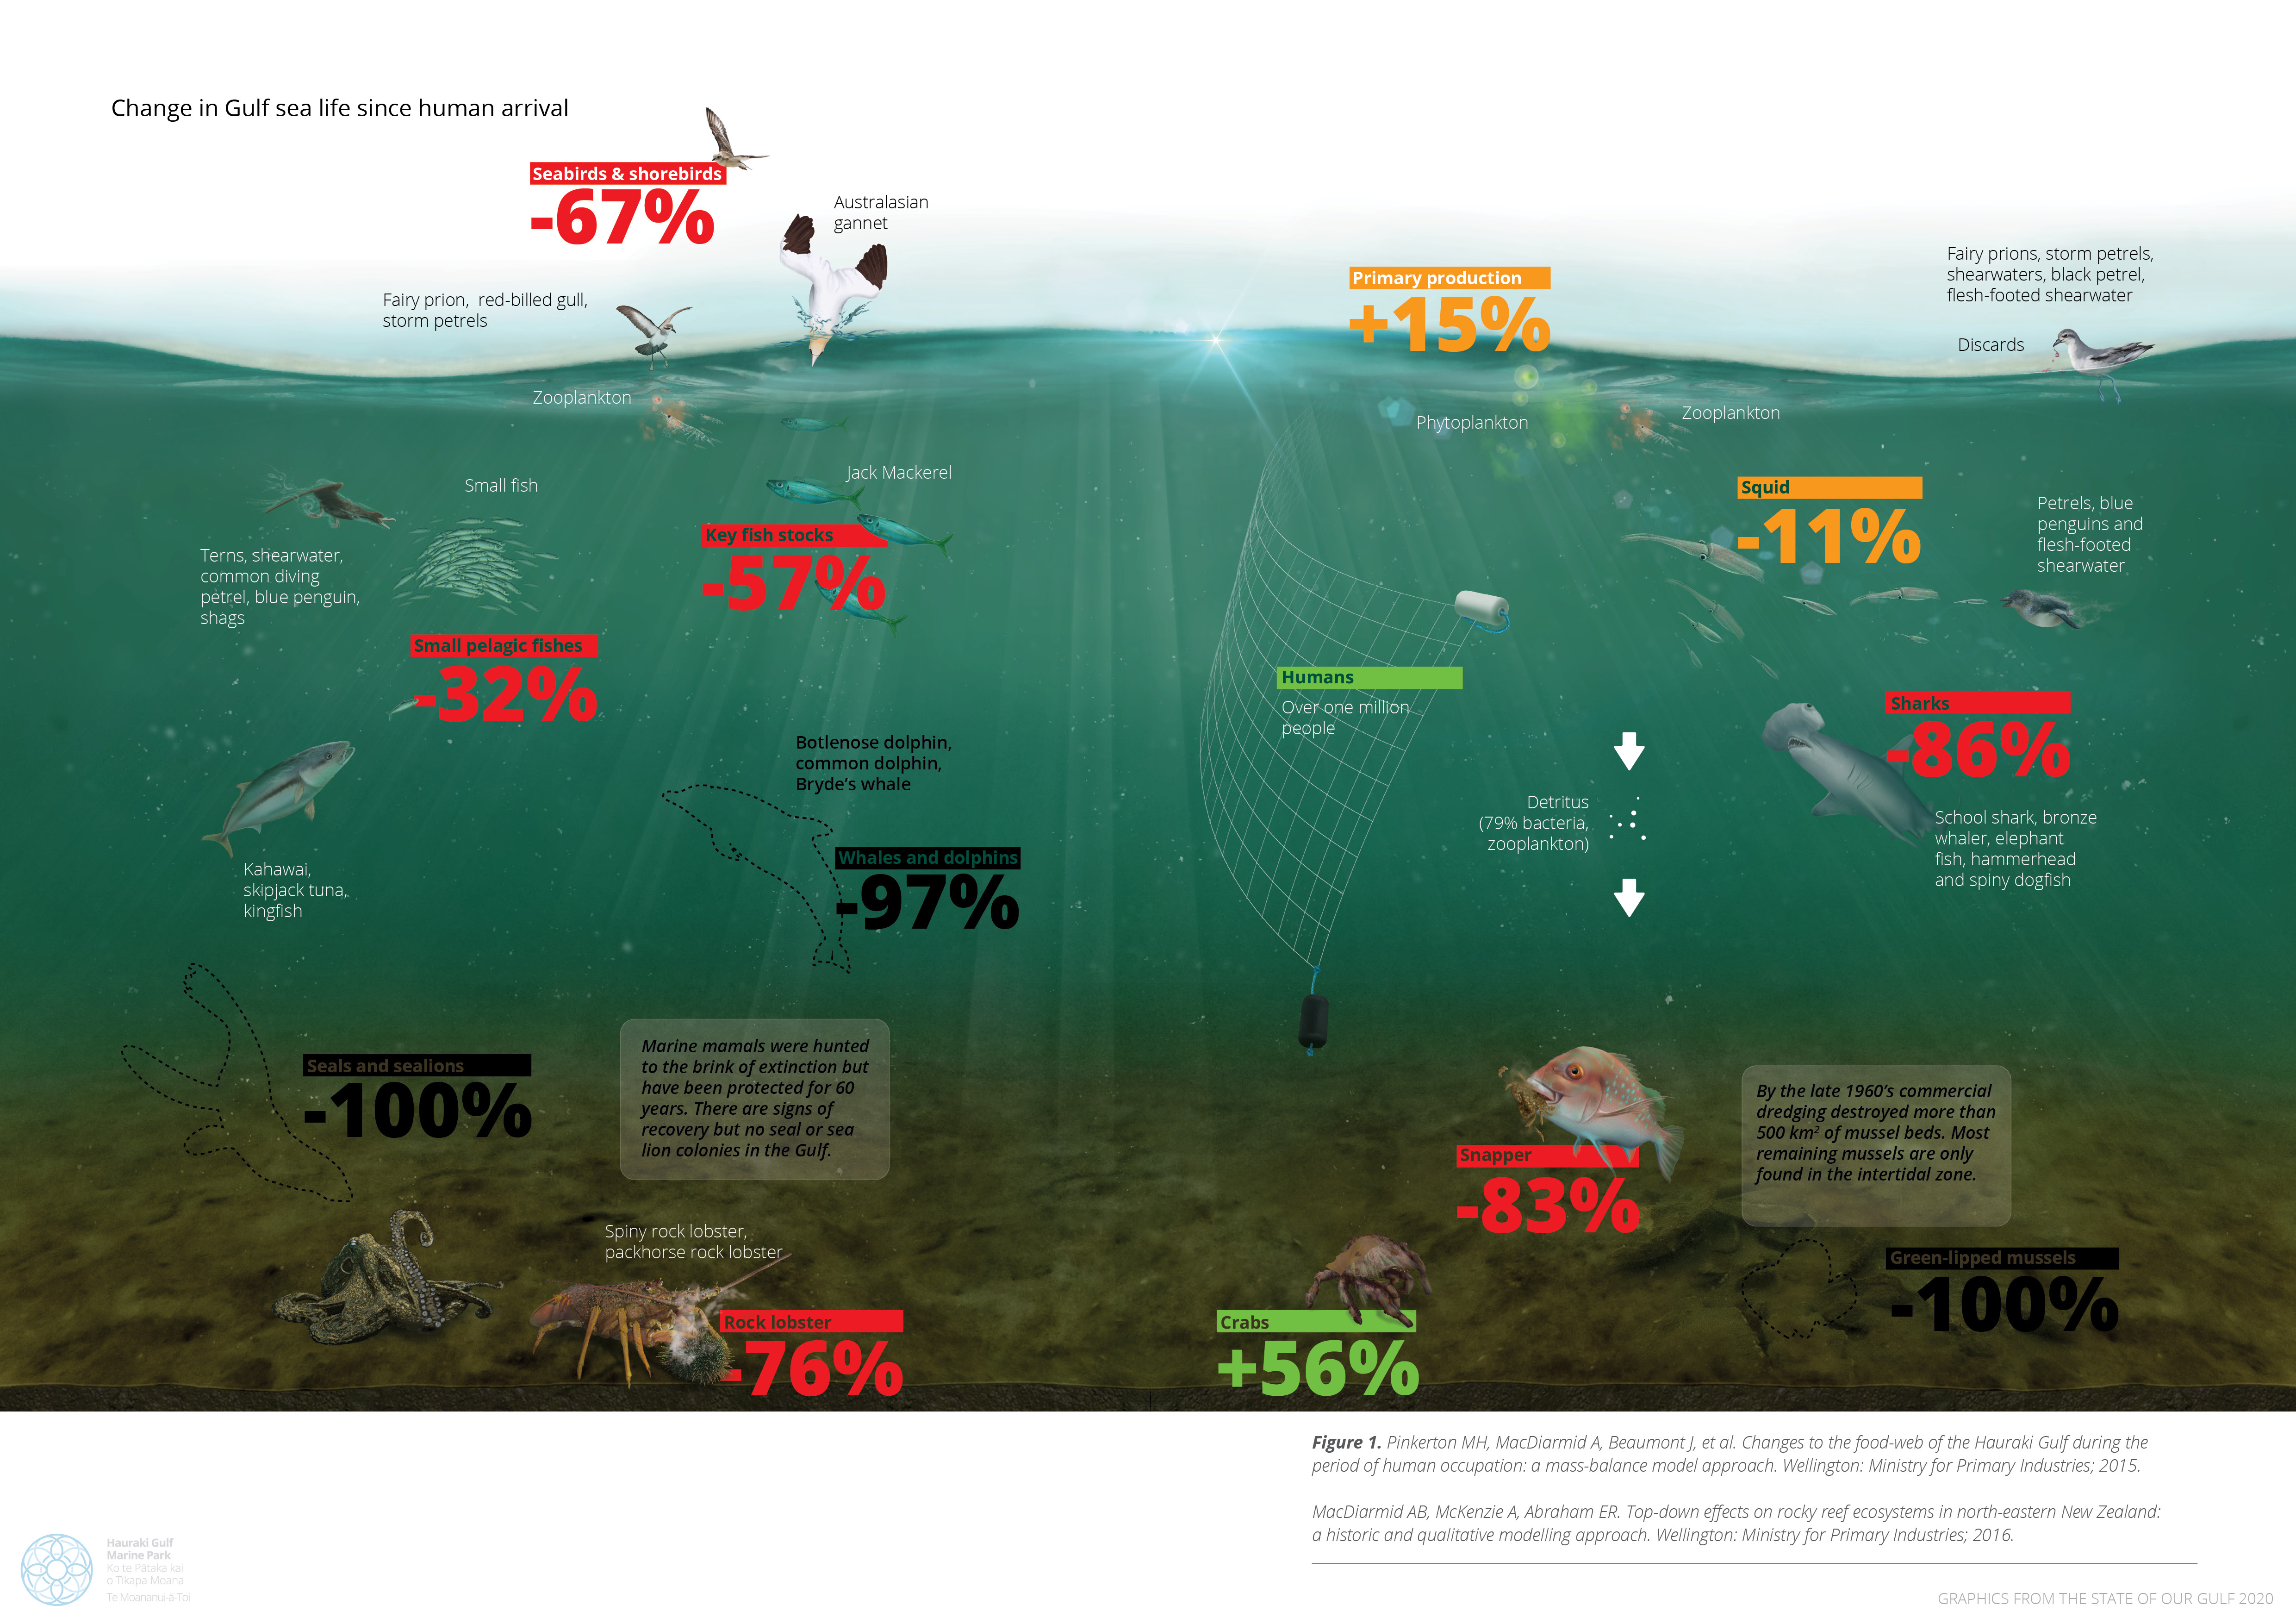
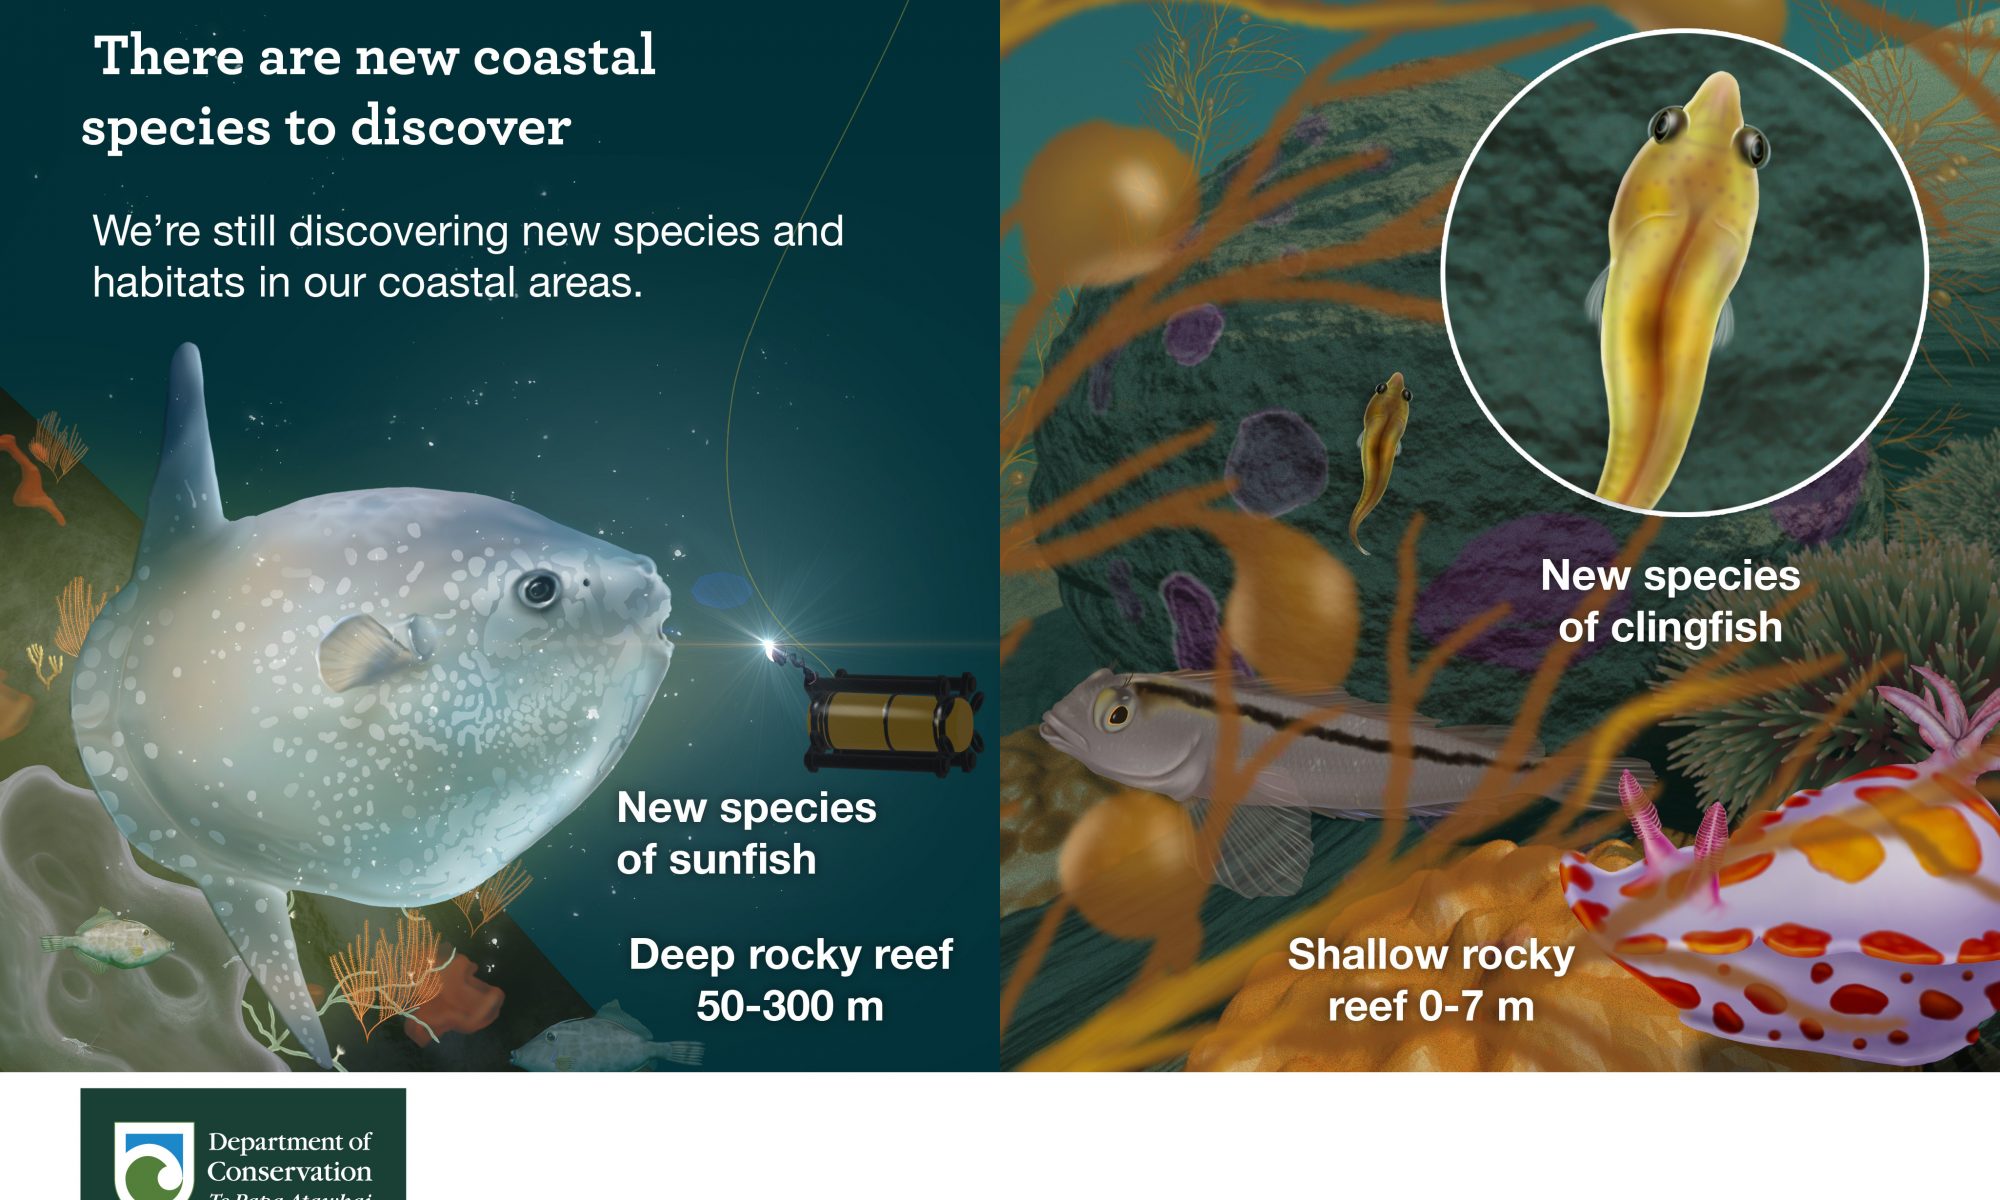
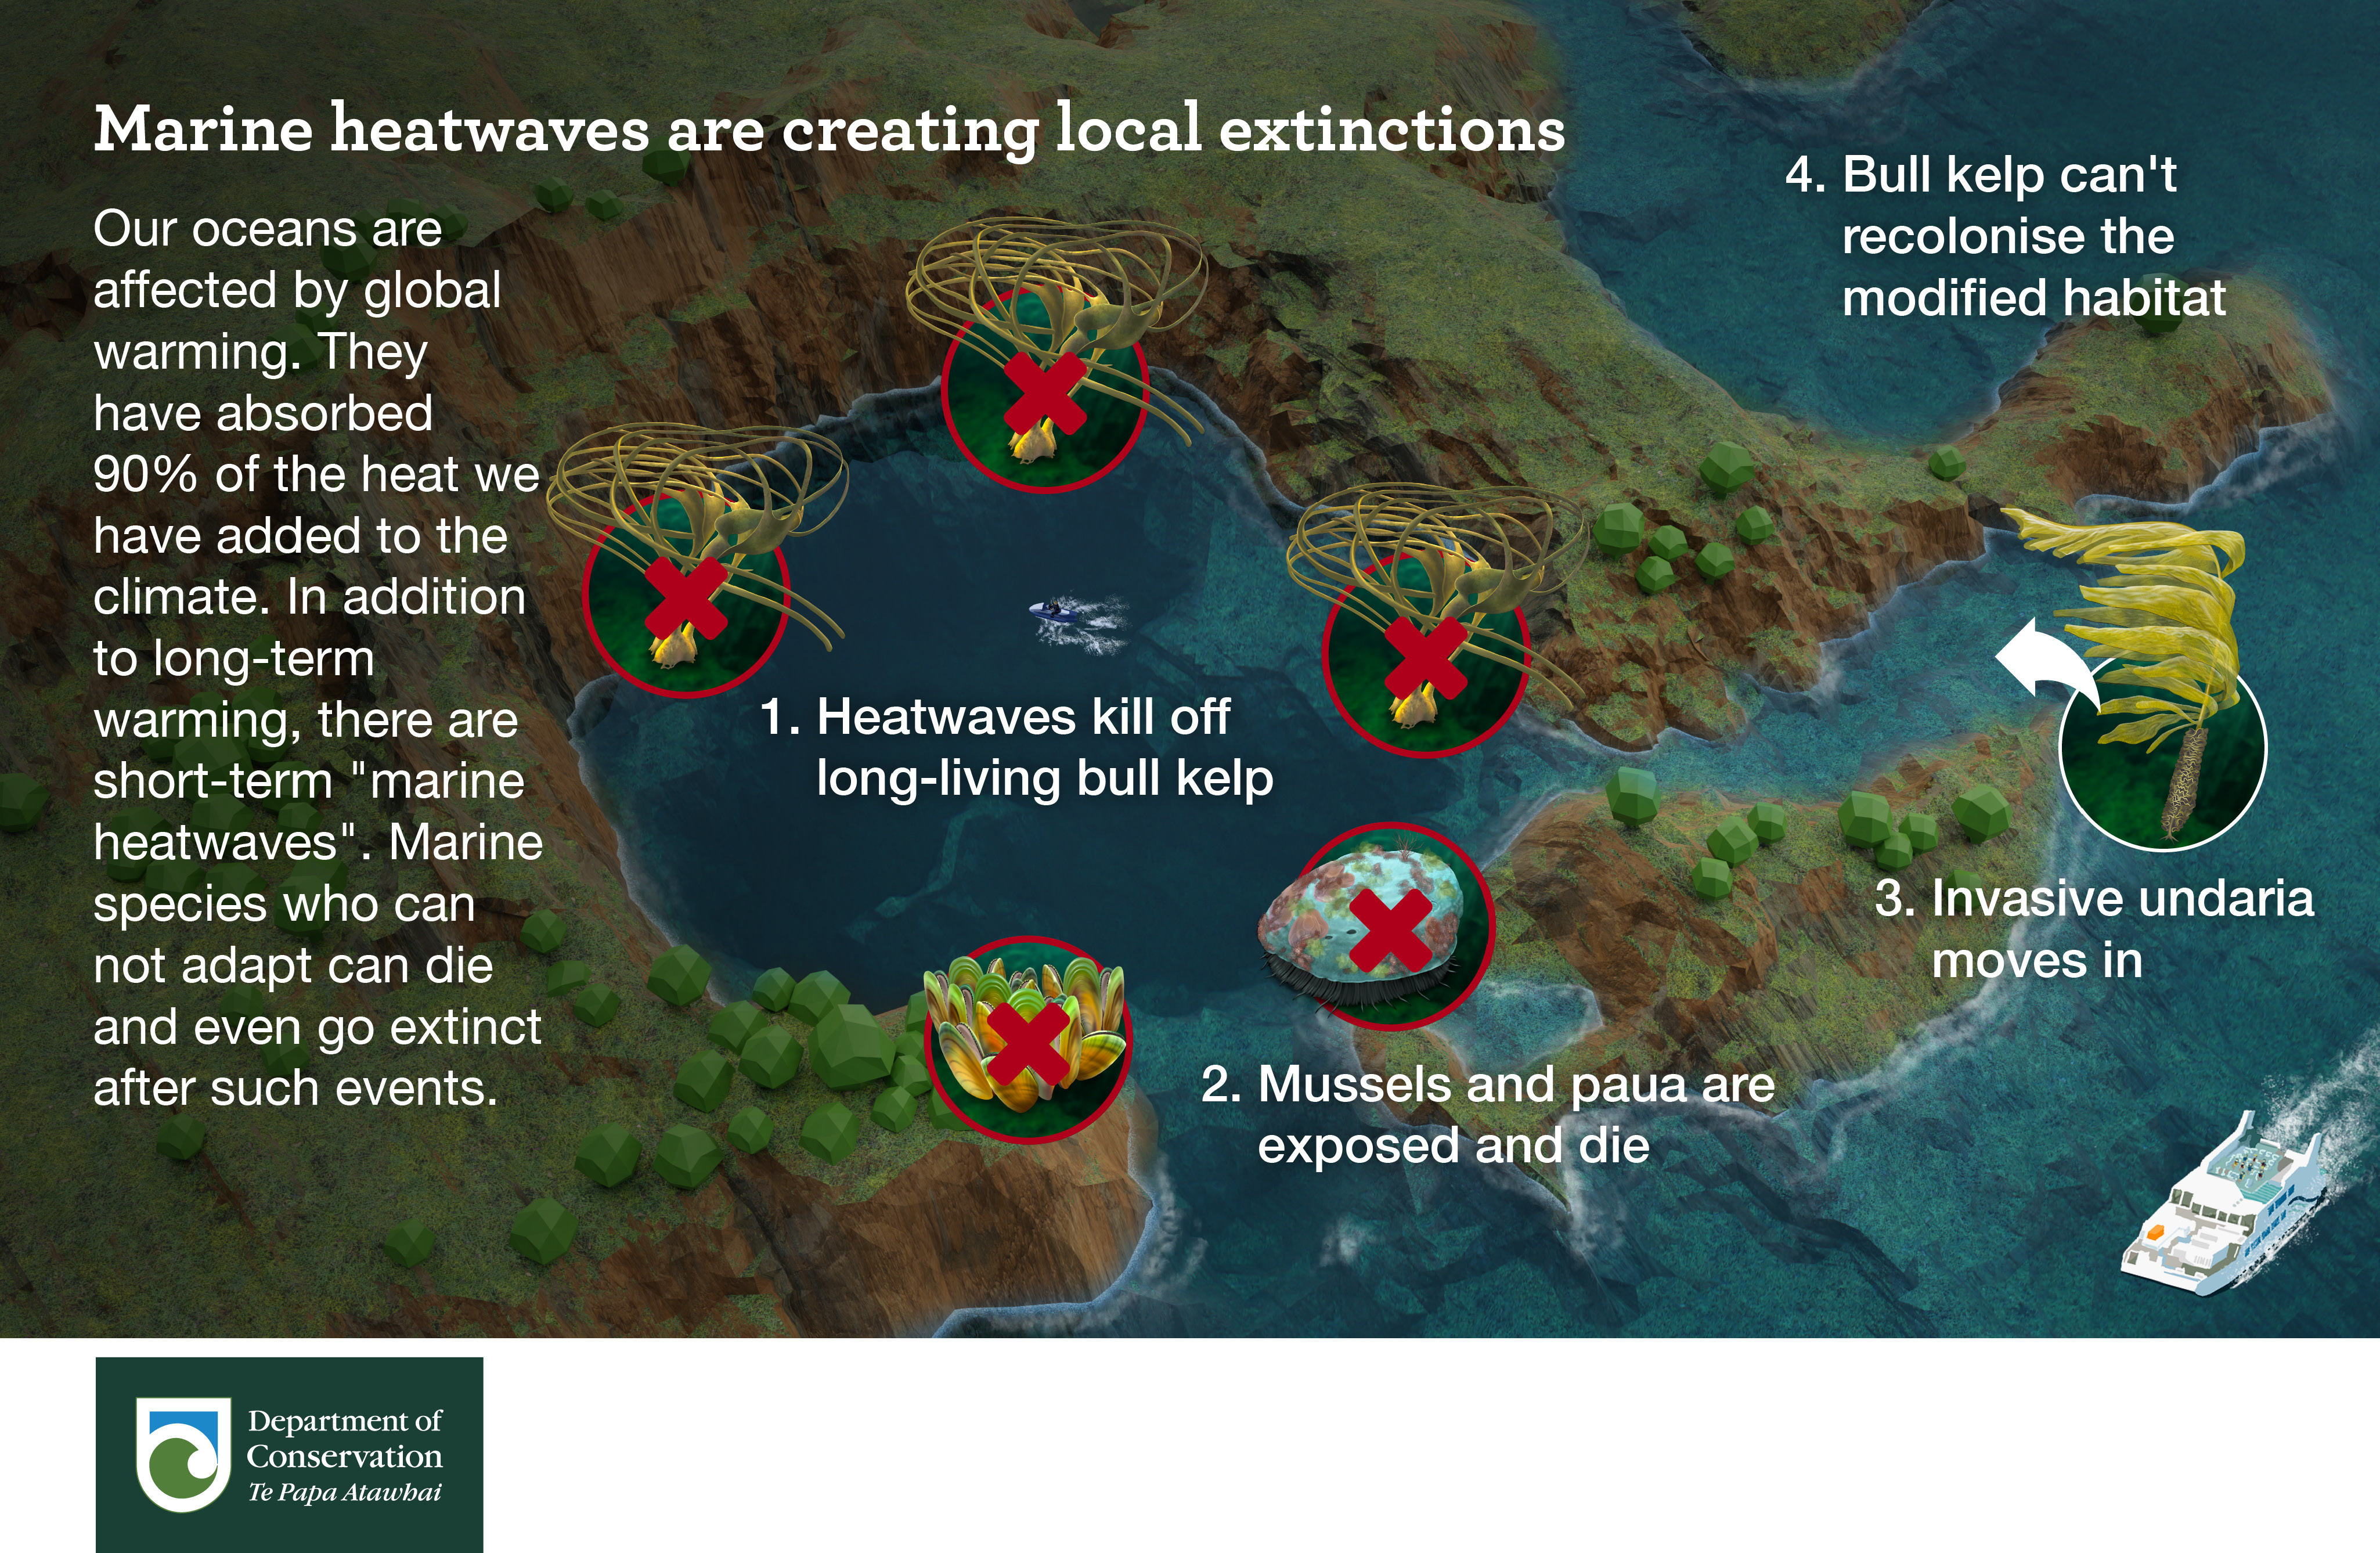
Last year I made a lot of graphics for the Department of Conservation’s awesome Marine Ecosystems Team. I have published them all here, as a reference. They are being used like this and this. UPDATE May 2022 more here.
Capture view (hide cameras and other visual aids first then export .PNG at a ridiculous resolution)
ArgiSoft Metashape worked much better than using Adobes photo stitching software (Photoshop & Lightroom) on the same data. But I need more overlapping images as all the software packages were not able to match all of any of the four test sequences I did.
I’m going to test shooting in video next. The frames will be smaller 2704×1520 (if I stick with linear to avoid extra processing for lens distortion) instead of 4000×3000 with the time-lapse but I’m hopping all the extra frames will more than compensate (2FPS=>24FPS).
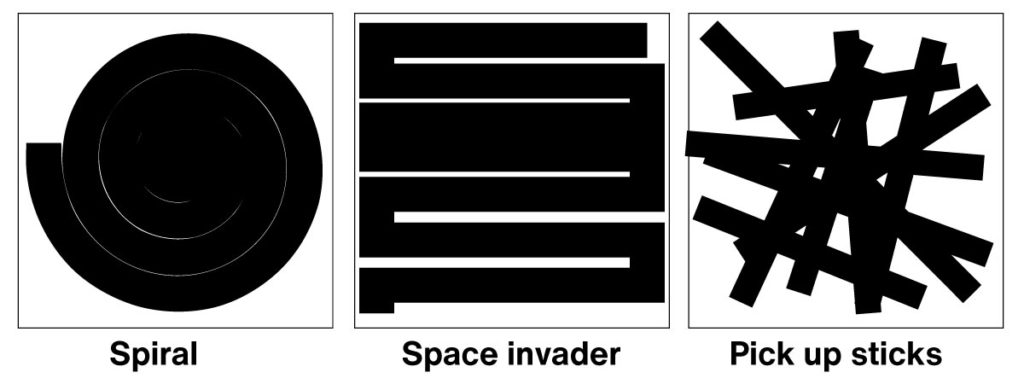
In theory an ROV will be better but I don’t think there are any on the market that know where they are based on what they can see. All the work arounds for knowing where you are underwater are expensive, here are two UWIS & Nimrod. I want to see if we can do this with divers and no location data. I don’t think towing a GPS will be accurate enough to match up the photos but it does seem to work with drones taking images of bigger scenes (I want this to work in 50cm visibility). I expect if I want large complete images the diver will need to follow another diver who has left a line on the seafloor. One advantage of this is that the line could have a scale on it, but I’m hoping to avoid it as the lines will be ugly 😀 So far I can do only two turns before it fails. There are three patterns that might work (Space invaders, Spirals and Pick up sticks). For my initial trials I am focusing on Space invaders.
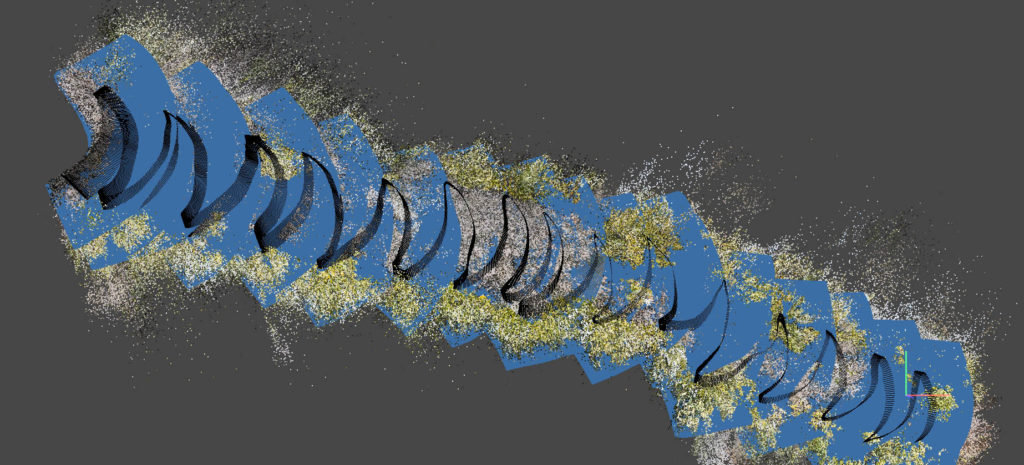
Video provides lots more frames and the conversion is easy. A land based test with GPS disabled, multiple turns, 2500 photos, 2704 x 2028 linear, space invader pattern at 1.2m from the ground worked perfectly. However I cant get it to work underwater. In every test so far Metashape will only align 50-100 frames. I tried shooting on a sunny day which was terrible as the reflection of the waves dancing on the seafloor confuses the software. But two follow up shoots also failed, when I look at the frames Metashape cant match I just don’t see why its can’t align them. Theses two images are in sequence, one gets aligned and the next one is dropped!
Here is what the test footage looks like, I have increased the contrast.
I have also tried exporting the frames at 8fps to see if the alignment errors are happening because the images are too similar but got similar results (faster).
Detailed advice from Metashape:
Since you are using Sequential pre-selection, you wouldn’t get matching points for the images from the different lines of “space invader” or “pick up sticks” scenarios or from different radius of “spiral” scenario.
If you are using “space invader” scenario and have hundreds or thousands of images, it may be reasonable to align the data in two iterations: with sequential preselection and then with estimated preselection, providing that most of the cameras are properly aligned.
As for the mesh reconstruction – using Sparse Cloud source would give you very rough model, so you may consider building the model from the depth maps with medium/high quality in Arbitrary mode. As for the texture reconstruction, I can suggest to generate it in Generic mode and then in the model view switch the view from Perspective to Orthographic, then orient the viewpoint in the desired way and use Capture View option get a kind of planar orthomosaic projection for your model.
Align ‘sequential’ only ever gets about 5% of the shots. Repeating the alignment procedure on ‘estimated’ picks up the rest but the camera alignment gets curved. I think I have calibrated the cameras to 24mm (it’s hard to see if that has been applied) but it doesn’t seem to change things.
I tried an above water test and made a two minute video of the Māori fish dams at Tahuna Torea. I used the same settings as above, but dropped the quality down to medium. It looks great!
The differences between above and below water are: Camera distance to subject, flotsam, visibility / image quality and colour range. If the footage I am gathering is too poor for Metashape to align it might mean we need less suspended sediment in the water to make the images. That’s a problem as the places I want to map are suffering from suspended sediment – which is why they would benefit from shellfish restoration.
The Agisoft support team are awesome. They processed my footage with f = 1906 in the camera calibration, align photos without using preselection and a 10,00 tie point limit. The alignment took 2.5 days but worked perfectly (click on the image below). There are a few glitches but I think the result is good enough for mapping life on the seafloor. I will refine the numbers a bit and post them in a seperate blog post, wahoo!
Here is my photogrammetry process / settings for GoPro underwater. I am updating them as I learn more. Please let me know if you discover an improvement. Thanks to Vanessa Maitland for her help refining the process.
Here is an example image made using the process, the area is about 8m in diameter, click on the image to see it full size.
Step 1: Make a video of the seafloor using a GoPro
If you’re at less than 5m deep you will need to go on a cloudy day for even light
Make sure you shoot 4k, Linear. Also make sure the orientation is locked in preferences.
Record you location and the direction your going to swim if you want to put your orthomosaic on a map
Swim in a spiral using a line attached to a peg to keep the distance from it even
Don’t leave any gaps or you will generate a spherical image
Step 2: Edit your video
There are lots of software packages that will do this, I use Adobe After FX where I can increase the contrast in the footage and add more red light depending on the depth. You might also find it easier to trim your video here but you can also do it in Step 5.
Step 3: Install and launch Agisoft Metashape Standard.
These instructions are for version 1.8.1
Step 4: Use GPU.
In ‘Preferences’, ‘GPU’ select your GPU if you have one, I also checked ‘Use CPU when performing accelerated processing’
Step 5: Import video
From the menu chose: ‘File’, ‘Import’, ‘Import Video’.
The main setting to play with here is the ‘Frame Step’ We have had success with using every third frame which cuts down on processing time.
If you have multiple videos you will have to import multiple chunks, then I recommend combining them before processing using ‘Workflow, Merge Chunks’, I have had better results doing this, rather than processing each chunk individually then choosing ‘Workflow, Align Chunks’.
Step 6: Camera calibration
From the menu chose: ‘Tools’, ‘Camera calibration’
Change ‘Type’ from ‘Auto’ to ‘Precalibrated’
Change the ‘f’ value to 1906
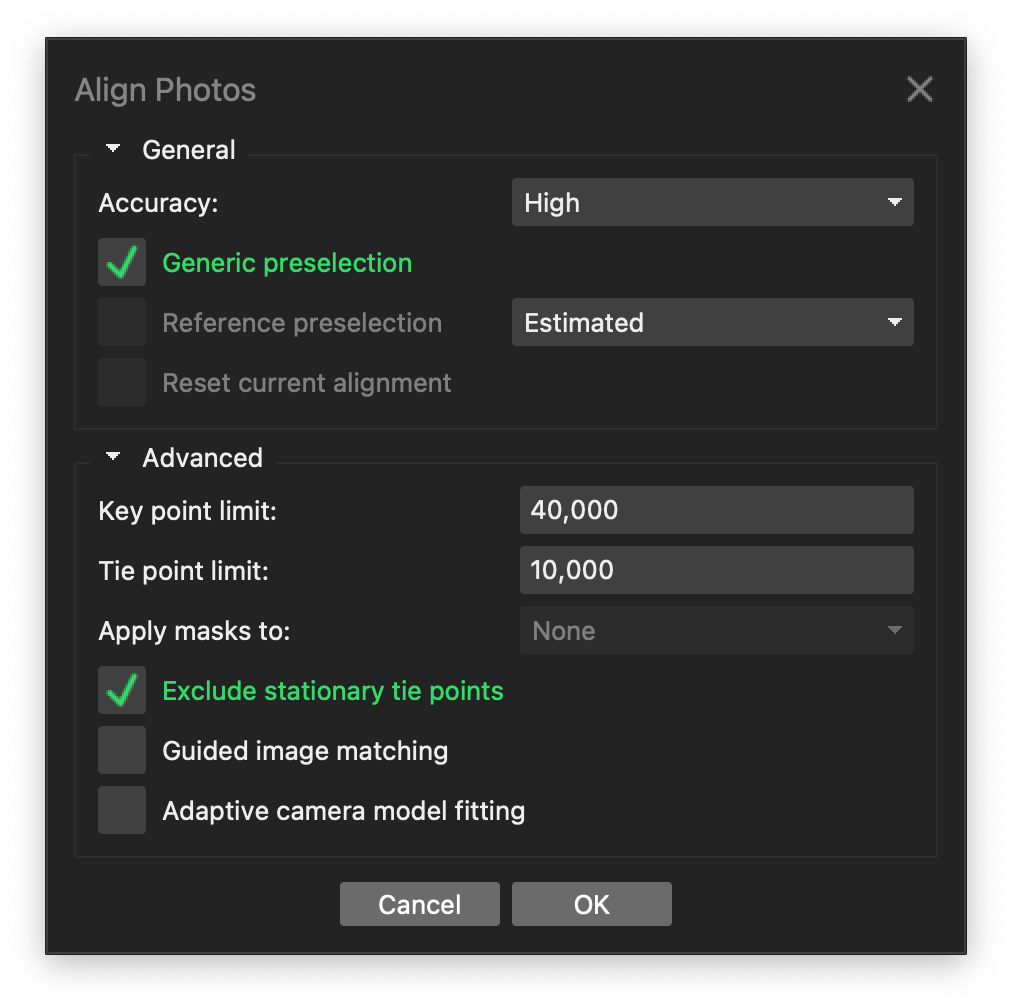
Step 7: Align photos
From the menu chose: ‘Workflow’, ‘Align Photos’
Check ‘Generic preselection’
Uncheck ‘Reference preselection’
Uncheck ‘Reset current alignment’
Select ‘High’ & ‘Estimated’ from the dropdown boxes Under ‘Advanced’ chose:
‘Key point limit’ value to 40,000
‘Tie point limit’ value to 10,000
Uncheck ‘Guided image matching’ & ‘Adaptive camera model fitting’
Leave ‘Exclude stationary tie points’ checked
If 100% of cameras are not aligned then try Step 8 otherwise skip to Step 9.
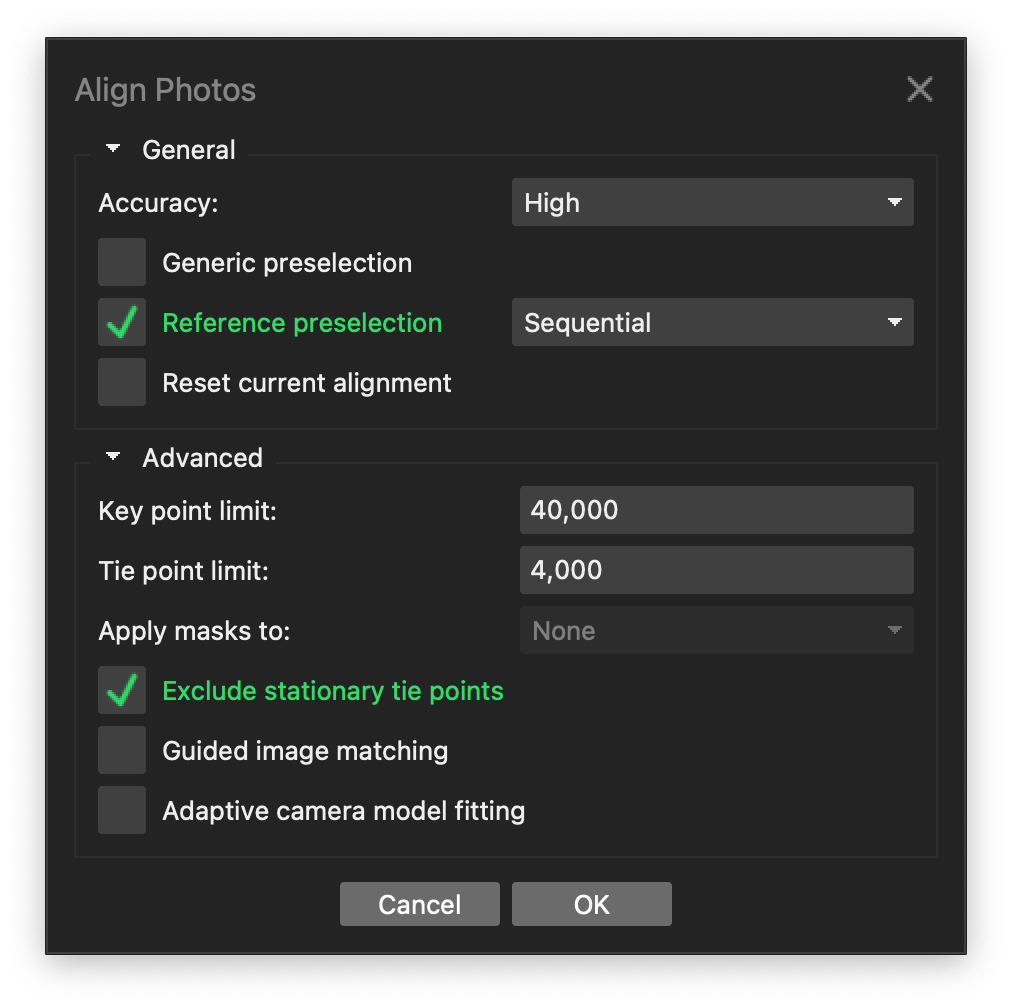
Step 8: Align photos (again)
From the menu chose: ‘Workflow’, ‘Align Photos’
Uncheck ‘Generic preselection’
Check ‘Reference preselection’
Uncheck ‘Reset current alignment’
Select ‘High’ & ‘Sequential’ from the dropdown boxes Under ‘Advanced’ chose:
‘Key point limit’ value to 40,000
‘Tie point limit’ value to 4,000
Uncheck ‘Guided image matching’ & ‘Adaptive camera model fitting’
Leave ‘Exclude stationary tie points’ checked
Now all the photos should be aligned, if not repeat step 7 & 8 with higher settings and check ‘Reset current alignment’ on step 7 only. I have been happy with models that have 10% of photos not aligned.
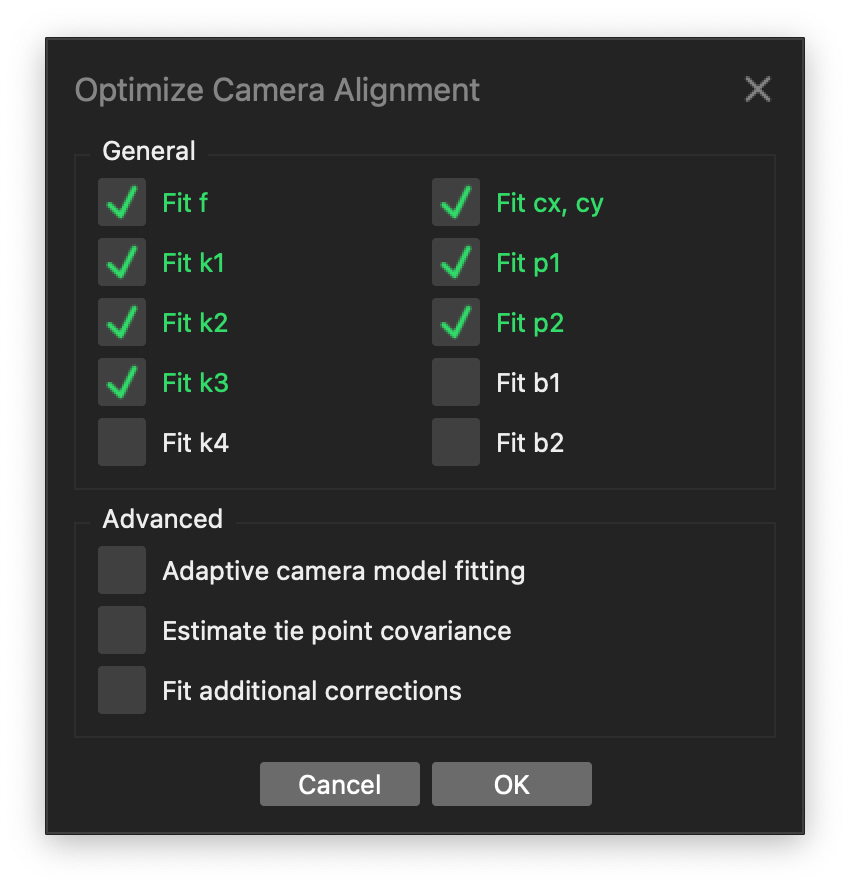
Step 9: Tools / Optimize Camera Locations
Just check the check boxes below (default settings):
Fit f, Fit k1, Fit k2, Fit k3
Fit cx, cy, Fit p1, Fit p2
Leave the other checkboxes (including Advanced settings) unchecked.
Step 10: Resize region Use the region editing tools in the graphical menu make sure that the region covers all the photos you want to turn into a 3D mesh. You can change what is being displayed in the viewport under ‘Model’, ‘Show/Hide Items’.
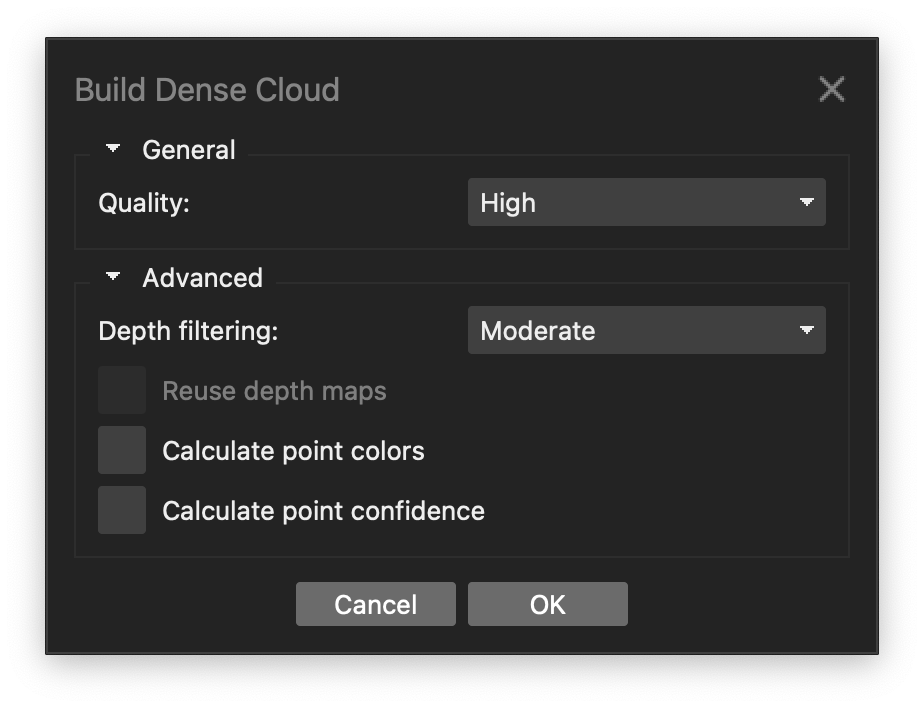
Step 11: Build dense cloud
Quality ‘High’
Depth filtering ‘Moderate’
Uncheck all other boxes.
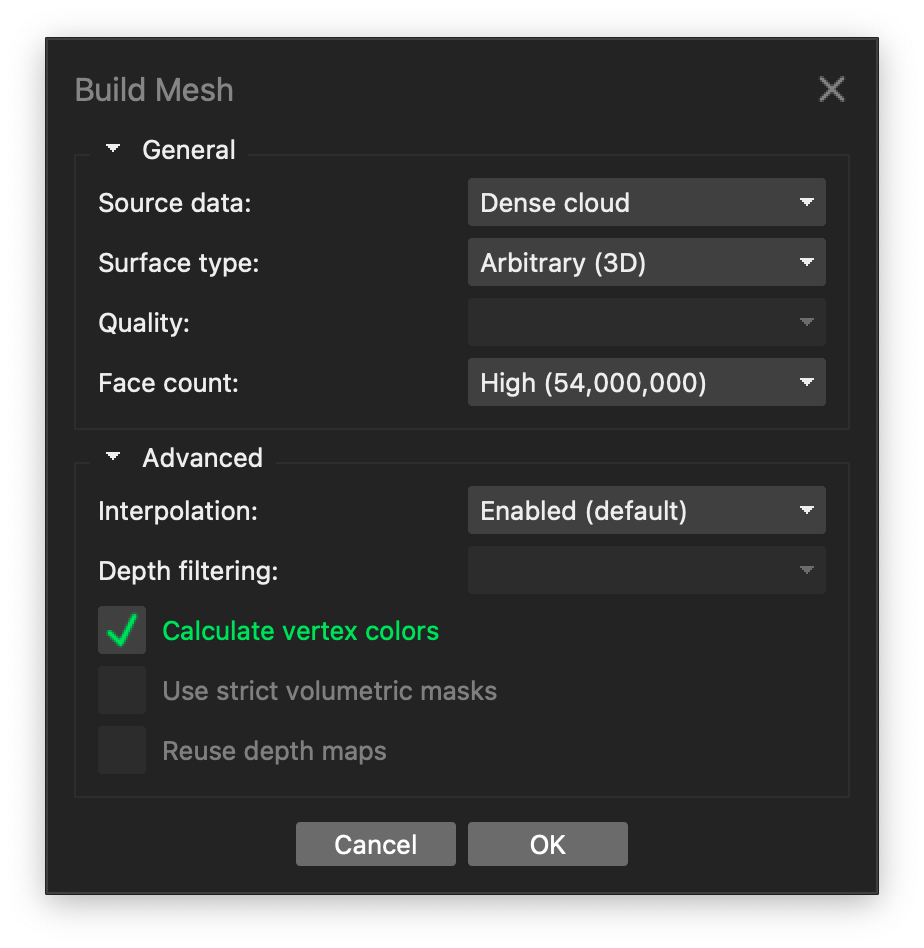
Step 12: Build mesh
From the menu choose: ‘Workflow’, ‘Build Mesh’
Select ‘Dense cloud’, ‘Arbitrary’
Select ‘Face count’ ‘High’
Under ‘Advanced’ leave ‘Interpolation’ ‘Enabled’
Leave ‘Calculate vertex colours’ checked
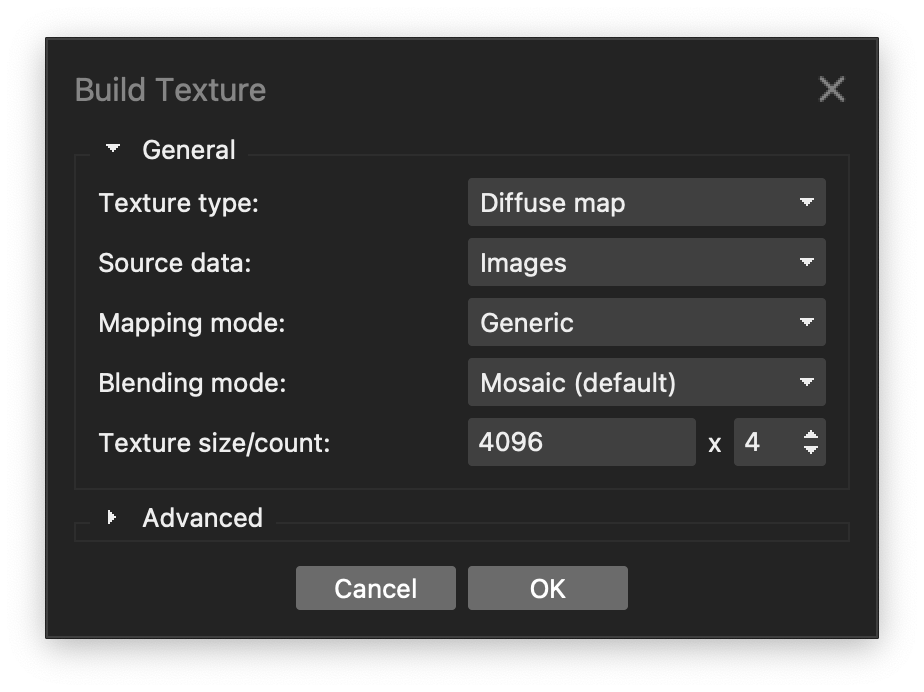
Step 13: Build texture
From the menu choose: ‘Workflow’, ‘Build Texture’
Select ‘Diffuse map’, ‘Images’, ‘Generic, ‘Mosaic (default)’ from the dropdown menus.
The texture size should be edited to suit your output requirements. The default is ‘4096 x 1’
Under ‘Advanced’ Turn off ‘Enable hole filling’ & ‘Enable ghosting filter’ if you’re using the image for scientific rather than advocacy reasons.
Step 14: Export orthomosaic You can orientate the view using the tools in the graphical menu. Make sure the view is in orthographic before you export the image (5 on the keypad). Then chose ‘View’, ‘Capture View’ from the menu. The maximum pixel dimensions are 16,384 x 16,384. Alternatively you can export the texture.
==
Let me know if you have experimented converting timelaspe / hyperlapse video to photogrammetry. There may be some advantages.
As communities get increasingly worried about the declining quality of their waterways there is more interest stream health assessments. I am a huge fan of the Waicare Invertebrate Monitoring Protocol (WIMP) which is simple enough that school students can use it. However the Waicare programme has been largely defunded by Auckland Council and there is no way for the public to share WIMP data. NIWA and Federated Farmers of New Zealand have put together https://nzwatercitizens.co.nz/ based on the New Zealand Stream Health Monitoring and Assessment Kit (SHMAK). It is great but incredibly hard to use, the manual is horrific. I believe this is being addressed but will take years. To help, the science learning hub has made this great guide for teachers and students. NIWA have put together some videos. They are not published together anywhere online so I have posted the list below:
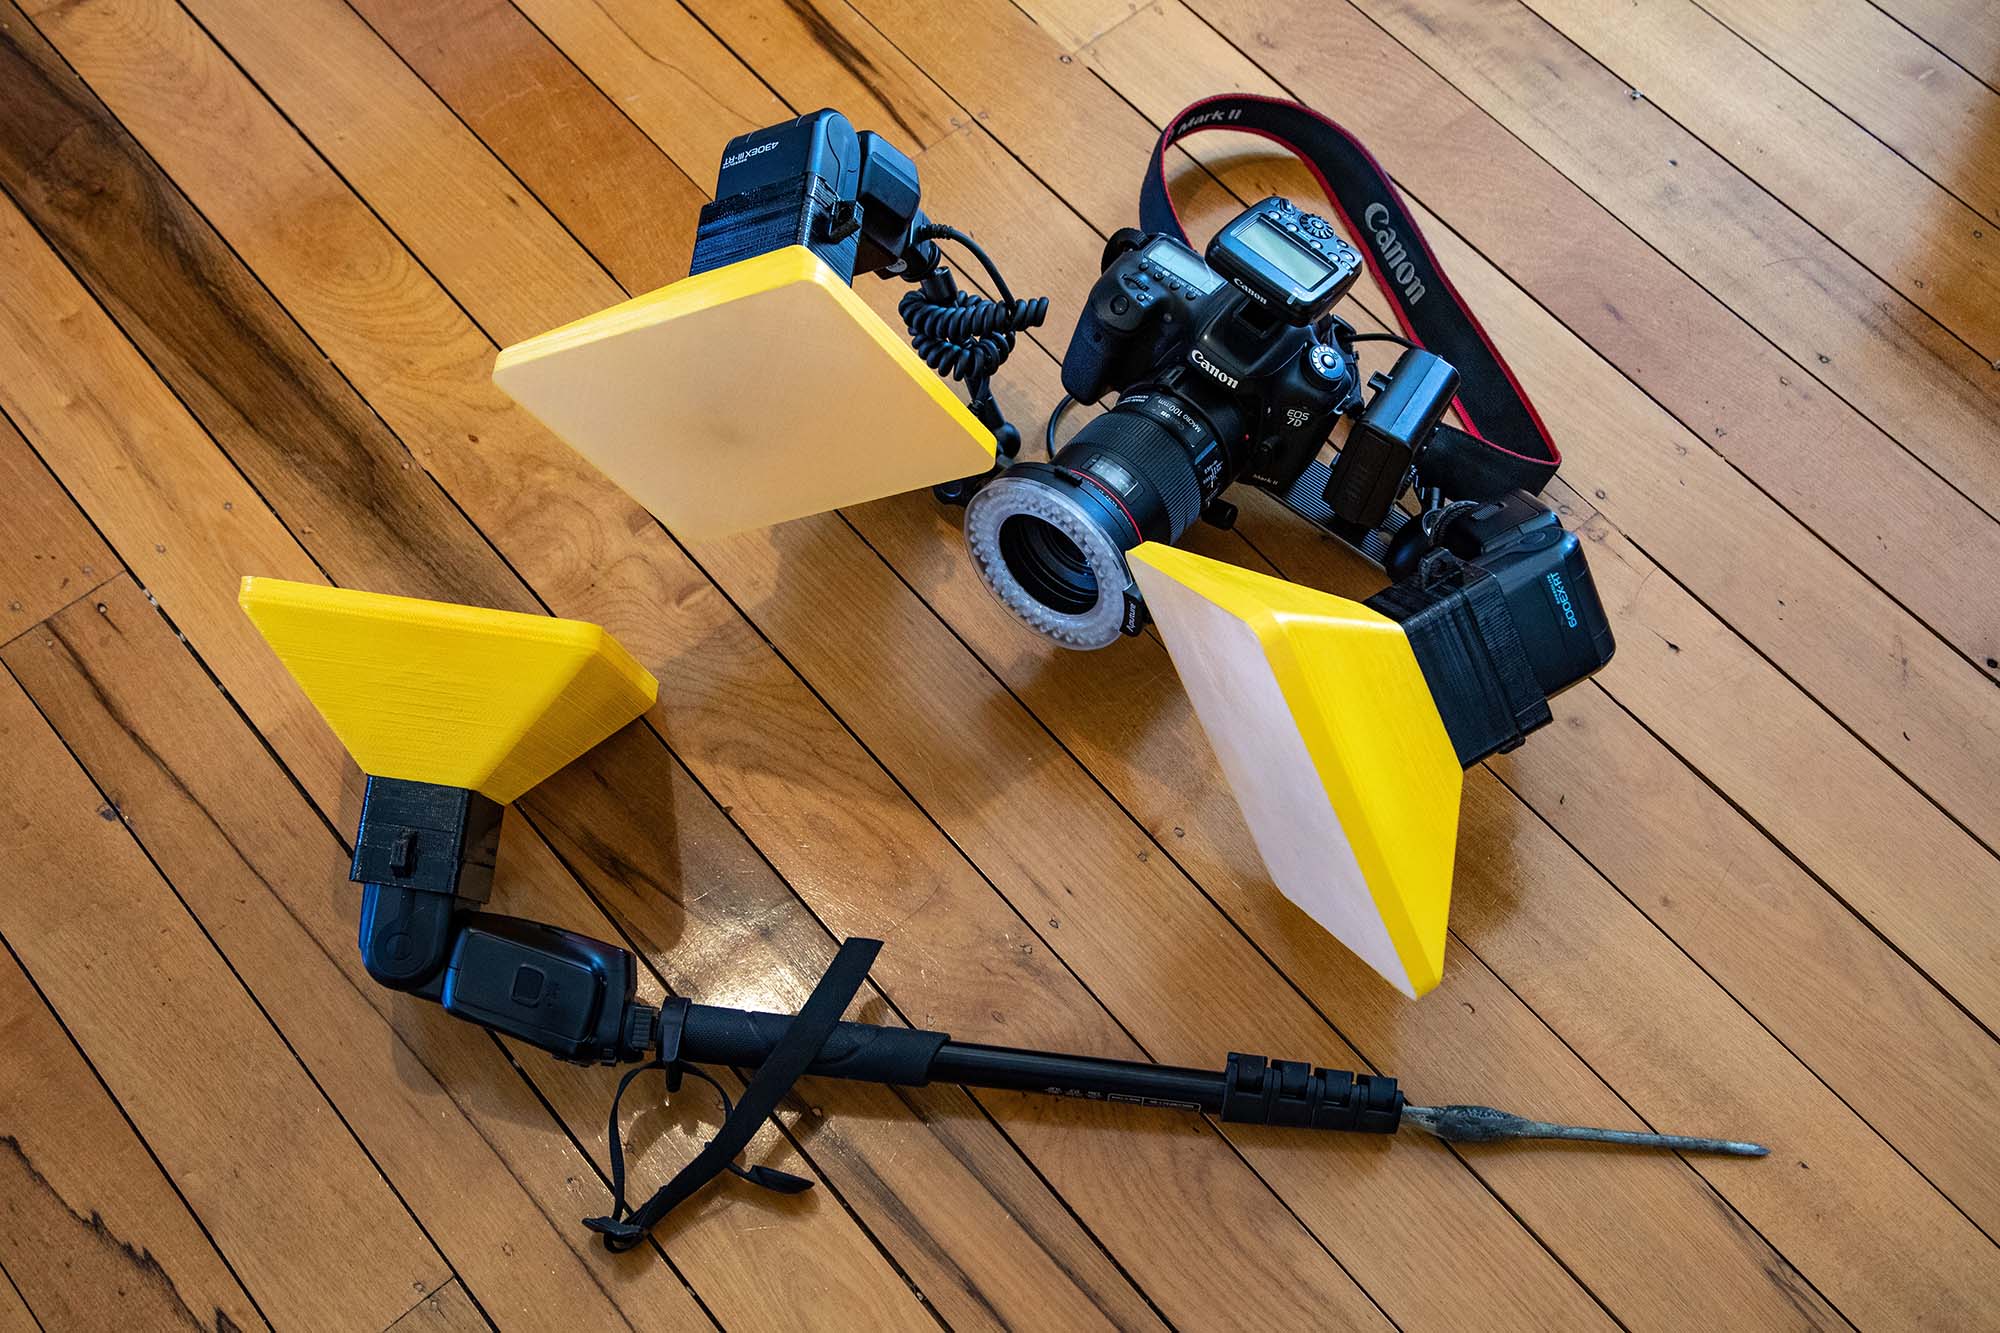
Updated from 2017. I have upgraded to some second hand 600EX RT’s, a radio transmitter, 3rd flash and some custom designed and 3D printed soft boxes. Files uploaded here. The soft boxes are printed using transparent PLA which has a natural frosty finish and produces lovely diffuse shadows (0.2mm @ 5 layers). I painted them black & yellow and lined the mouth with black tape so as to not scratch the flashes. The 600EX-RT’s are quite heavy and I had to use epoxy glue to re-enforce the cold shoes. I fibreglassed a giant nail to the base of a Manfrotto monopod to create the portable outdoor light stand.
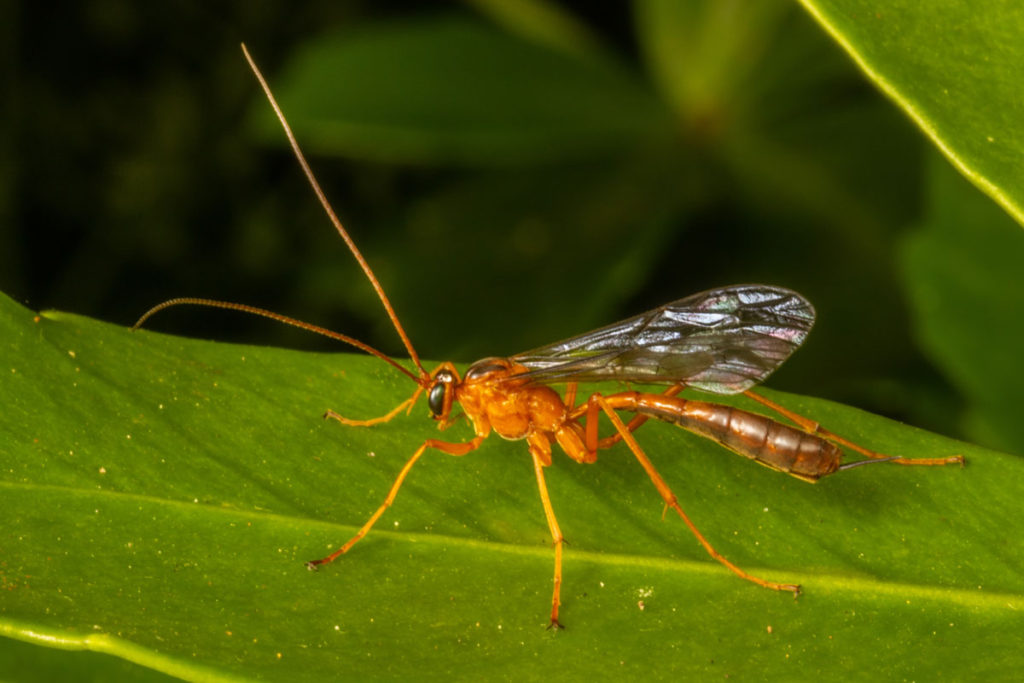
Example photo of a native wasp (Netelia ephippiata).